
This post continues from part 1 of the driver signing series which can be found here. Part 3 of the series can be found here.
It’s been a while since I looked at signing un-signed drivers I must admit. In fact, I’ve probably not signed one since my original post on AppDeploy (now ITNinja) back in 2010! I’ve been caught up in ‘other worlds’ since then, but I’m finally back to write a second part to this original post (which incidentally I’ve modified and re-written here and you may need to reference this throughout this post).
Anyway, this second part is a small piece on how driving signing works (high level) and an issue that I’ve stumbled upon and resolved recently.
Why Sign a Driver?
It’s a way of ensuring that a driver package has not been tampered with since it was tested and approved. In our self-signing example, you are testing and approving it! It also means that non-administrative users will not get any security prompts when installing drivers for Plug and Play devices (depending upon your driver signing policy).
What is a Catalog file used for?
A catalog file contains digital signatures that reference each file in your driver’s INF file (referenced by the CopyFiles directive…..read on), allowing the operating system to verify the integrity of every file. If any files referenced by the driver INF file are changed after digitally signing the catalog file (including the INF itself!), the signature will be broken.
How is the Catalog Used when we Install the Driver?
The inf file looks for the catalog file that it is referencing and verifies the digital signature. It also verifies the cryptographic checksum of every file that is recorded in the signed catalog file. If any of this does not comply, the driver install will fail.
Debugging a Driver Install (With an Example)
I’m working on an un-signed Smart Card printer by IDP called Smart 50s. Here is the original INF file content:
; SMART.INF
;
; INF file for SMART Card Printer
;
; Copyright 2013 IDP Corp., Ltd
[Version]
Signature="$Windows NT$"
Provider=%Provider%
ClassGUID={4D36E979-E325-11CE-BFC1-08002BE10318}
Class=Printer
CatalogFile=smart.cat
DriverVer=09/16/2014,2.14.09.16
;
; Manufacturer section.
;
; This section lists all of the manufacturers
; that we will display in the Dialog box
;
[Manufacturer]
%Manufacturer%=INA, NTamd64, NTia64
;
; Model sections.
;
; Each section here corresponds with an entry listed in the
; [Manufacturer] section, above. The models will be displayed in the order
; that they appear in the INF file.
;
[INA]
%Product%=Product,USBPRINT\INASystemSMART_PrintDEAE
%Product30%=Product,USBPRINT\IDPSMART-30_Printer6622
[INA.NTamd64]
%Product%=Product,USBPRINT\INASystemSMART_PrintDEAE
%Product30%=Product,USBPRINT\IDPSMART-30_Printer6622
[INA.NTia64]
%Product%=Product,USBPRINT\INASystemSMART_PrintDEAE
%Product30%=Product,USBPRINT\IDPSMART-30_Printer6622
;
; Installer Sections
;
; These sections control file installation, and reference all files that
; need to be copied. The section name will be assumed to be the driver
; file, unless there is an explicit DriverFile section listed.
;
[Product]
CopyFiles=@smart.GPD
CopyFiles=@smart.INI
CopyFiles=@STDNAMES.GPD
CopyFiles=PRINTERUI
CopyFiles=PRINTERUNI
CopyFiles=PRINTERICM
CopyFiles=PRINTERMON
CopyFiles=PRINTERLIB
DataFile=smart.GPD
DataSection=UNIDRV_DATA
LanguageMonitor="IDP SMART Language Monitor,smartmon.dll"
Include=NTPRINT.INF
Needs=UNIDRV.OEM,UNIDRV_DATA
; Copy Sections
;
; Lists of files that are actually copied. These sections are referenced
; from the installer sections, above. Only create a section if it contains
; two or more files (if we only copy a single file, identify it in the
; installer section, using the @filename notation) or if it's a color
; profile (since the DestinationDirs can only handle sections, and not
; individual files).
;
[PRINTERUI]
smartUI.DLL
[PRINTERUNI]
smartUNI.DLL
[PRINTERICM]
cardprinter_d.icm
cardprinter_k.icm
cardprinter_k2.icm
cardprinter_k3.icm
[PRINTERLIB]
SmartComm2.dll
watch.dll
DrvPlugin.exe
CleanPrinter.exe
Watchman.exe
cputil.exe
cardprinter_mask_0.bmp
cardprinter_mask_1.bmp
cardprinter_mask_2.bmp
cardprinter_mask_3.bmp
cardprinter_mask_4.bmp
cardprinter_mask_5.bmp
cardprinter_mask_6.bmp
cardprinter_smart_p_0.prn
cardprinter_smart_p_1.prn
cardprinter_smart_p_2.prn
cardprinter_smart_p_3.prn
cardprinter_smart_p_4.prn
cardprinter_smart_p_5.prn
cardprinter_smart_p_6.prn
cardprinter_smart_p_7.prn
cardprinter_smart_p_8.prn
cardprinter_smart_p_9.prn
cardprinter_smart_s_0.prn
cardprinter_smart_s_1.prn
cardprinter_smart_s_2.prn
cardprinter_smart_s_3.prn
cardprinter_smart_s_4.prn
cardprinter_smart_s_5.prn
cardprinter_smart_s_6.prn
cardprinter_smart_s_7.prn
cardprinter_smart_s_8.prn
cardprinter_smart_s_9.prn
cardprinter_encoding.ini
[PRINTERMON]
smartmon.dll,,,0x00000020
;
; Data Sections
;
; These sections contain data that is shared between devices.
;
;
;  Location of source files not in Layout.inf.
;
[SourceDisksNames]
100 = %Product%
[SourceDisksFiles]
smart.GPD			= 100
smart.INI			= 100
STDNAMES.GPD			= 100
cardprinter_d.icm		= 100
cardprinter_k.icm		= 100
cardprinter_k2.icm		= 100
cardprinter_k3.icm		= 100
SmartComm2.dll			= 100
watch.dll			= 100
DrvPlugin.exe			= 100
CleanPrinter.exe		= 100
Watchman.exe			= 100
cputil.exe			= 100
cardprinter_mask_0.bmp		= 100
cardprinter_mask_1.bmp		= 100
cardprinter_mask_2.bmp		= 100
cardprinter_mask_3.bmp		= 100
cardprinter_mask_4.bmp		= 100
cardprinter_mask_5.bmp		= 100
cardprinter_mask_6.bmp		= 100
cardprinter_smart_p_0.prn	= 100
cardprinter_smart_p_1.prn	= 100
cardprinter_smart_p_2.prn	= 100
cardprinter_smart_p_3.prn	= 100
cardprinter_smart_p_4.prn	= 100
cardprinter_smart_p_5.prn	= 100
cardprinter_smart_p_6.prn	= 100
cardprinter_smart_p_7.prn	= 100
cardprinter_smart_p_8.prn	= 100
cardprinter_smart_p_9.prn	= 100
cardprinter_smart_s_0.prn	= 100
cardprinter_smart_s_1.prn	= 100
cardprinter_smart_s_2.prn	= 100
cardprinter_smart_s_3.prn	= 100
cardprinter_smart_s_4.prn	= 100
cardprinter_smart_s_5.prn	= 100
cardprinter_smart_s_6.prn	= 100
cardprinter_smart_s_7.prn	= 100
cardprinter_smart_s_8.prn	= 100
cardprinter_smart_s_9.prn	= 100
cardprinter_encoding.ini	= 100
[SourceDisksFiles.x86]
smartui.dll			= 100,i386
smartuni.dll			= 100,i386
smartmon.dll			= 100,i386
[SourceDisksFiles.amd64]
smartui.dll			= 100,amd64
smartuni.dll			= 100,amd64
smartmon.dll			= 100,amd64
[SourceDisksFiles.ia64]
smartui.dll			= 100,amd64
smartuni.dll			= 100,amd64
smartmon.dll			= 100,amd64
;
; Call SetupSetDirectoryId with 66000 to set the target directory at runtime
; (depending on which environment drivers are getting installed)
;
[DestinationDirs]
DefaultDestDir=66000
PRINTERICM=66003
PRINTERMON=66002
PRINTERLIB=11
[Strings]
Provider = "IDP Corp,.Ltd."
Manufacturer = "IDP Corp,.Ltd."
Product = "IDP SMART-50 Card Printer"
Product30 = "IDP SMART-30 Card Printer"
Since we’ve already generated a corporate certificate using my guide, all we really need to do here is sign the catalog file. Occasionally we need to delete the vendor’s cat file and generate our own cat file. I sometimes do this for peace of mind, to ensure that the cat file is up to date and contains all the correct file checksums referenced by the INF file.
So next I imported my certificate into the Trusted Root store (i need to do this before I can verify the digital signature), and verified the digital signature of my catalog file using SignTool.exe. Everything reported a success.
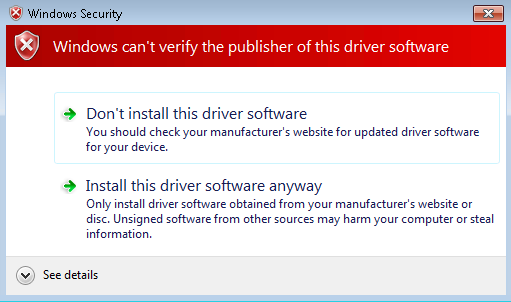
Next (and as a quick test) I lumped a copy of DPInst.exe into the driver folder on my dev machine, and ran it interactively by double clicking it. And then I gasped:
 How can this be? Signtool.exe verified the digital signature successfully? So I delved into the driver log file which is located here:
C:\Windows\inf\setupapi.dev.log
And when I scrolled down to the bottom (incidentally deleting this file will regenerate a new one, which may be handy when debugging) I found this line:
!!!  sto:                Failed to verify file 'UNIDRVUI.DLL' against catalog. Catalog = smart.cat, Error = 0xE000024B
!!!  sto:                Catalog did not contain file hash. File is likely corrupt or a victim of tampering.
!!!  sto:           Driver package appears to be tampered. Filename = C:\windows\System32\DriverStore\Temp\{36d82f49-0898-19c5-54bf-8b142c4bcd4b}\smart.inf, Error = 0x800F024B
!!!  sto:           Driver package appears to be tampered and user does not want to install it.
!!!  ndv:           Driver package failed signature validation. Error = 0xE000024B
This was interesting. Take note of the exclamation marks at the very start – a single exclamation is a warning, and a triple exclamation mark is an error/failure So I did a little Googling and stumbled upon this. Specifically, it says:
PnP device installation considers the digital signature of a driver package to be invalid if any file in the driver package is altered after the driver package was signed. Such files include the INF file, the catalog file, and all files that are copied by INF CopyFiles directives.
I knew the INF and Catalog files hadn’t been modified since signing them, so it led me to the bit in bold. Was UNIDRVUI.DLL being copied to the driver store by a CopyFiles directive? It turns out it wasn’t!! So this meant fixing a vendor’s INF file which I can assure you, isn’t much fun! What’s important to note here is that even though Signtool.exe verified the digital signature of my catalog file, that does not mean to say that the catalog file contains all the required file checksums!
Here are the changes I made – unfortunately I won’t go in to how we modify INF files since it’s not a trivial task to explain. Anyway:
1. Added a CopyFiles directive, pointing to a section called UNIFILES. 2. Created the UNIFILES section, and added all the files that we missing (it wasn’t just UNIDRVUI.DLL)
3. Added the files to the SourceDisksFiles.x86 section, so that they could be located on disk (they were in a sub folder called i386)

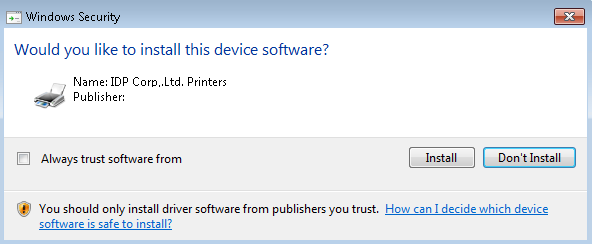
I then deleted the cat file so I could re-generate it with all the new file checksums. And I re-signed it with my certificate. I then ran DPInst.exe and successfully got the following prompt!
 At this point I thought it was good to go. As you all probably know, Windows 7 and above come with some handy VBScript printing utilities located here:
C:\Windows\System32\Printing_Admin_Scripts\en-US
The scripts basically use WMI classes under the hood to add/configure printers and ports etc. I wanted to run quick test using the WMI approach instead of the PrintUI.dll approach since we can return exit codes, and I think there are issues returning exit codes via Rundll32 and PrintUI.dll (it tends to just print the error out to a dialog window as opposed to returning an exit code).
When we tried to install our driver, it returned an 2148467266 exit code. So I checked inside setupapi.dev.log and found the following:
!!!  sto:           Driver package signer is unknown. Assuming untrusted signer. Error = 0x800F0242
!!!  ndv:           Driver package failed signature validation. Error = 0xE0000242
Assuming an untrusted signer? That’s strange. So I MOVED the certificate to the Trusted Publishers store. And then I got this:
!!!  sto:           Catalog signer is untrusted. No error message will be displayed as client is running in non-interactive mode.
!!!  ndv:           Driver package failed signature validation. Error = 0xE0000247
Fair enough. I kind of expected that. So i decided to put my certificate in BOTH the Trusted Publisher AND the Trusted Root stores. And voila. No error messages and a return code of 0!
I’ll probably end up using C:\Windows\System32\PnPutil.exe to install my driver above. It has a handy command line switch (/i) that installs the driver on matching devices that are connected to the system (the WMI approach doesn’t seem to do this – although perhaps a little more research is needed surrounding this!). In other words, when a user plugs in this device (without the drivers installed – they need to plug it in first to mount the Virtual Printer port) it will create an entry under Devices and Printers in the ‘Unspecified’ section. Installing the driver and adding a printer via WMI works, but also leaves the ‘Unspecified’ device until the user logs off and logs back in (even after a print spooler stop and start). PnPutil.exe seems to install the driver and then match it up to this unspecified device and moves it to the Printers and Faxes section. That’s all….for now.